A Photo & Discussion Forum for Wharram Design Enthusiasts
Hiya!
We hope to have our TIKI 21 in the water soon.
One of the last steeps is the constrution of the mast. We have ordered an aluminum tube but it is only available in 6 meters. So we will have to make wooden inserts on both ends. Are there any hints on how to fixate the inserts?
Concerning the mast we will follow the plan but I am thinking about two modifications:
Increasing the mastlength to 7m. I know about the importance of keeping the center of effort as low as possible but I imagine it would improve comfort on the plattform to hoist the main 50cm higher in light winds. Are there any experiences with this idea? We will anyway use 6mm wire for shrouds and forestay, the sails remain unchanged.
Secoundly I would like to use a spinnaker or gennaker. This means there must be a second halyard which exits the mast above the forestay. I have seen mastheads with a mastcrane and a pulley ahead similar to the arrangement astern for the gaff. Unfortunately this means the halyard goes down ahead of the mast and cannot be hidden by the luffpocket. I dont like the idea. So I am thinking about copying the jibhalyard disk-arrangment.
Please tell my your thoughts about this. Approved solutions and pictures are welcome.
Ciao
Pius
Views: 3086
Replies to This Discussion
-
Hi Kim,
I am getting close to constructing a new mast using the sleeving method, as I can't get 4" 6016 longer then 20'. Where is the best place to put the sleeve join - or does it not matter (top, bottom, middle)?
Thanks,
Roger
kim whitmyre said:
-
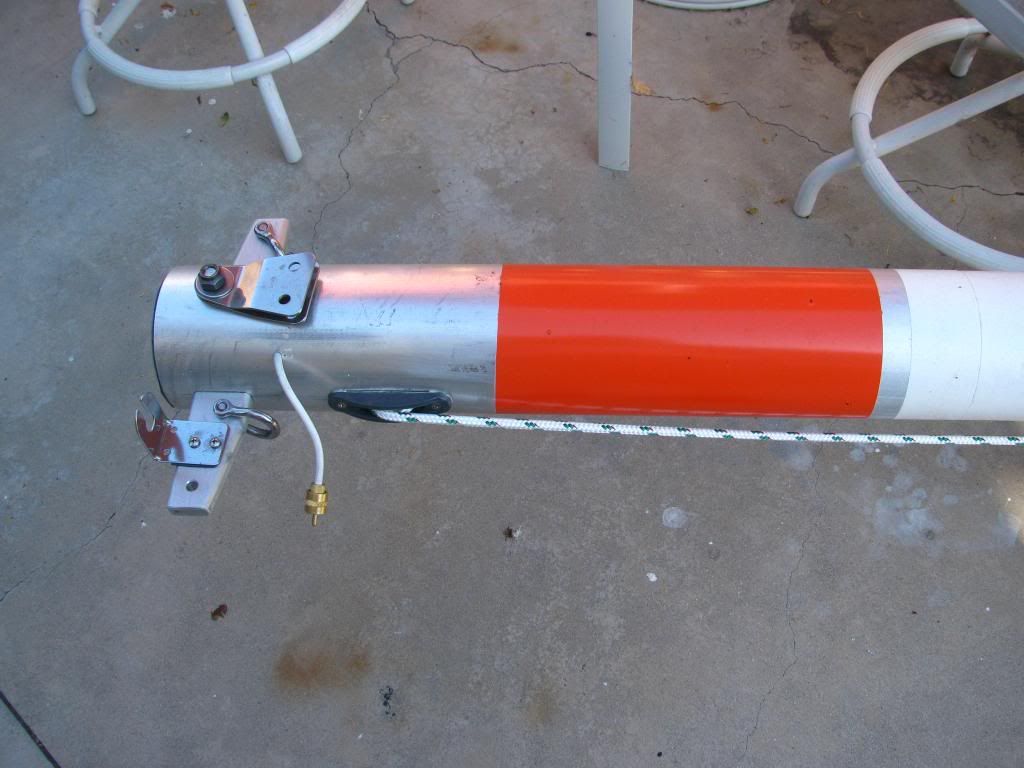
Roger, here you can see the join on my mast just into the white painted area on the right:
When I do the bottom of the mast, the join will be roughly 5-6' up from the foot. In my considered opinion, I would divide the mast into thirds, and not make the shorter section of the mast any longer than that third. It could be shorter, as my mast is...What design are you using for the foot?
-
Hi Kim,
Thanks for getting back to me. The standard Tiki 21 mast is about 21' 6", but I want to give it another few feet to give some breathing room - say 24' max. If I understand properly, you are suggesting 3 equal lengths (i.e. 8' feet each) and two sleeve joints, rather than a 20' length with a 4' length and one sleeve?
Roger
-
Roger, 20' + 4' would be my choice, the other scenario would be for a much taller mast; I was going beyond what you were considering, sorry for muddying my reply!
Kim
-
Thanks Kim - was there any rationale for putting the join at the top rather than the bottom of the mast? I'm wondering if there is a difference in the loads (between top and bottom)?
Roger
-
Roger, the only rationale in my case was that the original (as it came to me) mast was wooden from the foot for 6' or so with 18" inserted into the aluminum tube, which continued up to the current join, with the Wharram wooden mast head on from there! The wooden blind sheave was rotted badly, thus the new aluminum masthead. I wanted to get the mast up and so didn't want to get involved with the building of a new aluminum base that will be required when the wooden lower section is replaced with al. tube.
As far as loads go, the sleeve is very strong, so you could put it at the top or bottom. The halyards are pulling straight down, the forestay is pulling against the shrouds, which pushes the mast down on the mastbeam. A quite simplified version of what is actually happening, no doubt! And, the hull to beam lashings are holding it all together! ;~) Amazing. . .
Kim
-
Pius, Interesting questions which I went through this time last year when rebuilding my 21. I built a new mast using an aluminium tube and wooden inserts made from sections of the old wooden mast. I wondered about another foot or so to give better visibility in light winds. I think this is a good idea. With halyard marks, you can always lower the sails to the standard height when the wind picks up.
I turned down sections a step in my old mast to fit them into my new alloy tube using a home made lathe built from a router and a ply box and a power drill. To fix the wooden inserts into the mast, I used heat gun glue sticks melted with a hot air gun. I learnt this thick from making kayak paddles. Given a tightish fit for your wooden sections, this work very well. It has the BIG advantage that you can remove and adjust the inserts by heating up the tube using a heat gun. This is better than an interference fit of permanent glue which is all a bit final.
Ian
-
Thanks guys, useful tips. About the mast, mine is 6 m standard length of tubes and pipes, would like to make it 6.40m this will be enough , inner pipe, clear, dmentions also, not shure if the exterior is fixed with rivets, can't see this on the pic. How to taper the inner pipe? Is this necessary ?
-
Johan, no such tapering is necessary (or possible!) for the inner pipe/sleeve. Here is a picture that will clarify:
You cut a slot in the sleeve that is wide enough to allow its compression to fit into the inner diameter of the mast. In the picture above, I was doing a test fitting of the sleeve into the mast pipe. The large "hose" clamps were more than strong enough to compress the sleeve.
Rivets or screws are used to fix the sleeve, yes.
-
Hi Kim, thnx for the reply, clear, nice pics , good explanation.way?
kim whitmyre said:Johan, no such tapering is necessary (or possible!) for the inner pipe/sleeve. Here is a picture that will clarify:
You cut a slot in the sleeve that is wide enough to allow its compression to fit into the inner diameter of the mast. In the picture above, I was doing a test fitting of the sleeve into the mast pipe. The large "hose" clamps were more than strong enough to compress the sleeve.
Rivets or screws are used to fix the sleeve, yes.
-
How is the Crane attached t?
kim whitmyre said:Pius,
Think about using aluminum tube sleeves to add the proper length: much less maintenance!
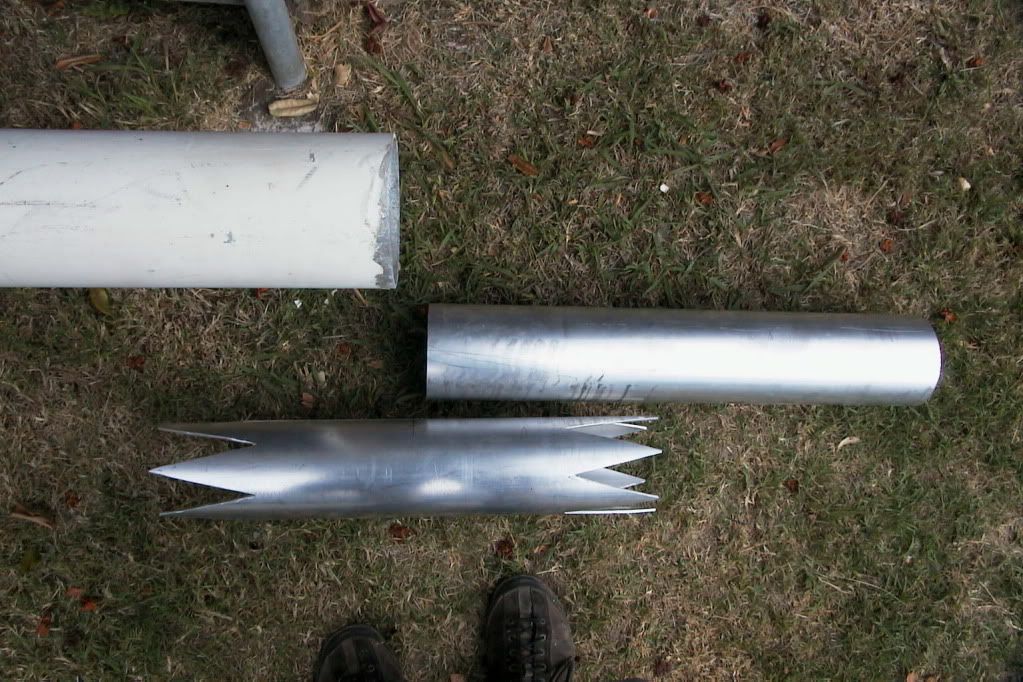
 On the left is the mast, lower middle is the sleeve (with unseen slot for compression cut into it), and mast extension on the right. The cuts on the sleeve eliminate point loading that a straight cut would cause. Fix the sleeve with monel rivets, or use stainless machine screws with plenty of anti-seize, ie, Tuf-Gel. I have the formula for sizing the sleeve somewhere: I'll post it. (the tubes are all the same size: the mast is on horses, so closer to the camera.)
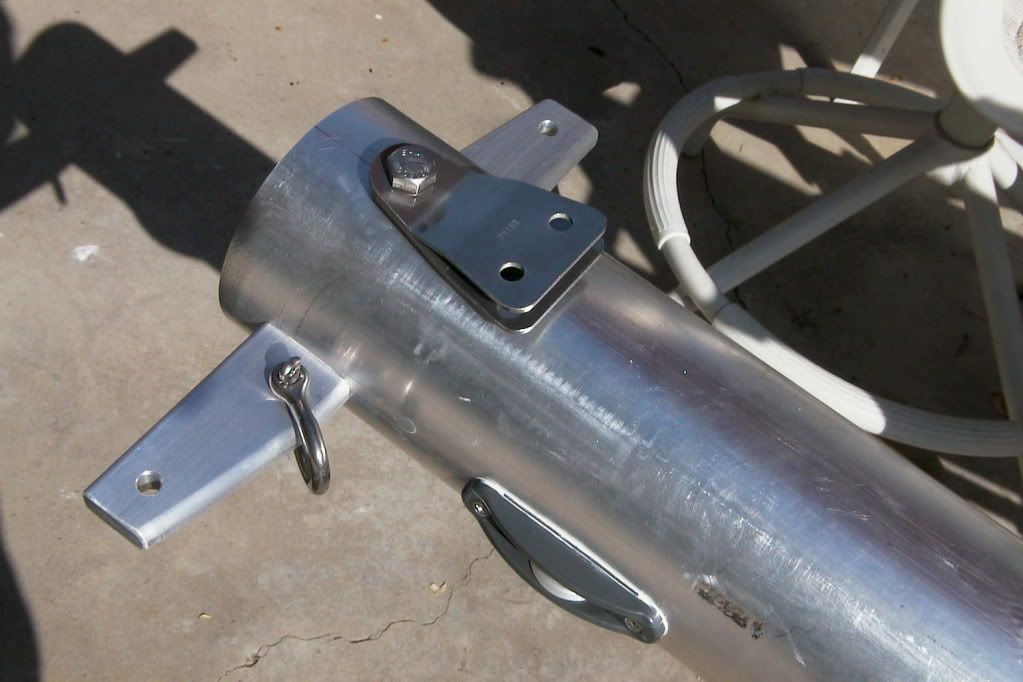
Here is a shot of my masthead arrangement:
 The jib halyard is internal, the main and peak (gaff) halyards run through blocks that hang off the aft crane, while the forestay uses the shackle, and the fore crane hole is for the light-air halyard block.
-
Hi Johan, the crane is a single piece of aluminum: I drilled 2 holes the width of the crane straight through the mast, then sawed out the material between the holes for a close fit. The large bolt that you see goes all the way through the mast, the crane, and also captures the shroud tangs as it does so. The bolt has a castelleted, self-tightening nut on its threaded end.
- ‹ Previous
- 1
- 2
- 3
- Next ›
© 2025 Created by Budget Boater.
Powered by
![]()
